How to Create and Use Nat Network in VirtualBox?
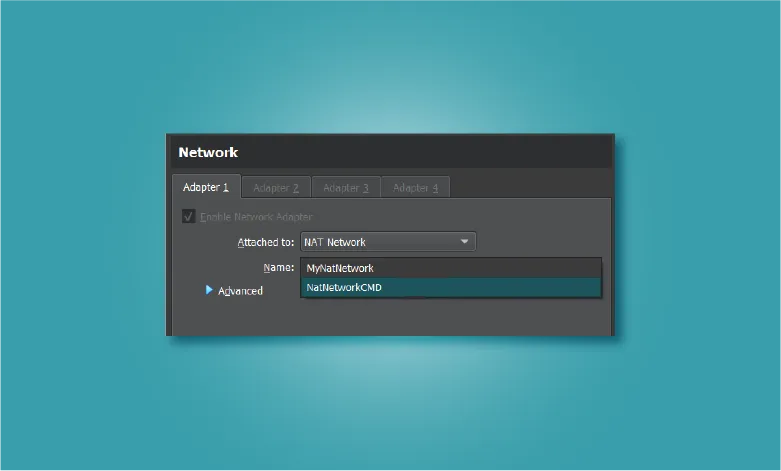
Want to create a Nat Network for your VMs to communicate with each other? Then you’re at the right place. In this step-by-step guide, I will show you how to create a NAT network in VirtualBox.
I will show you both the graphical method and the command-line method to create a NAT network and how to add VMs to the newly created network.
We will also check the connectivity between the VMs after assigning them to the newly created NAT network and even removing the NAT network.
Before all that, let’s start with understanding what is NAT and the different network modes (Nat and Nat Network) in VirtualBox.
Network Address Translation
NAT stands for Network Address Translation. It is the process of mapping an IP (Internet Protocol) address to another by changing the header of IP packets while in transit via a router.
Here’s a graphical representation to make things clearer:
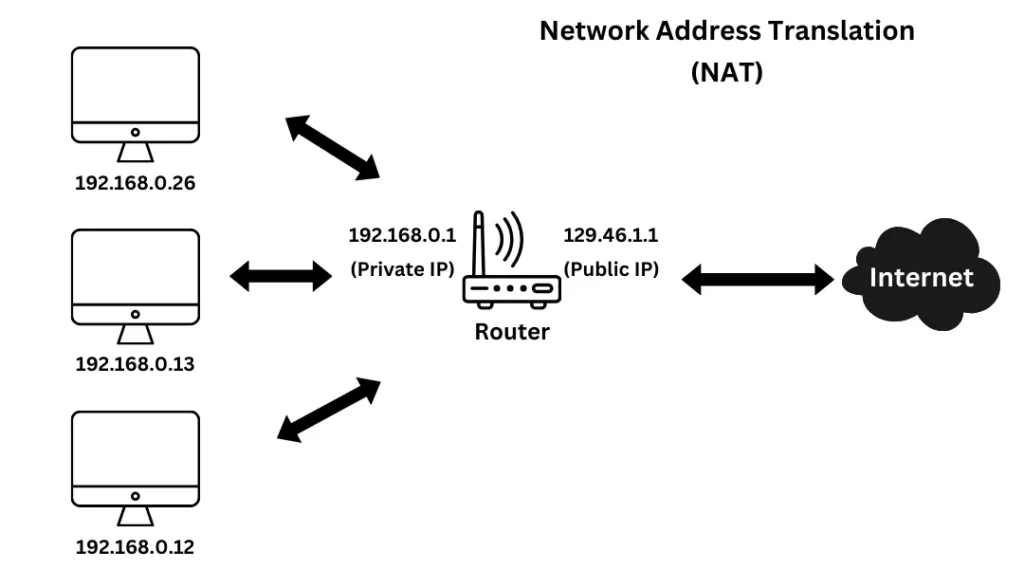
This is just a basic overview of NAT. I am not going into more detail. If you want to read more about NAT, there are countless resources on the internet. Just search for “Network Address Translation” and you’ll find various websites explaining and going into details.
One such resource is the official documentation of the VirtualBox.
Difference Between NAT and NAT Network in VirtualBox
As you’ve already understood what NAT is, it’s time to have a clear understanding of the difference between NAT and NAT Network. You can find both NAT and NAT network modes in the VM settings of VirtualBox.
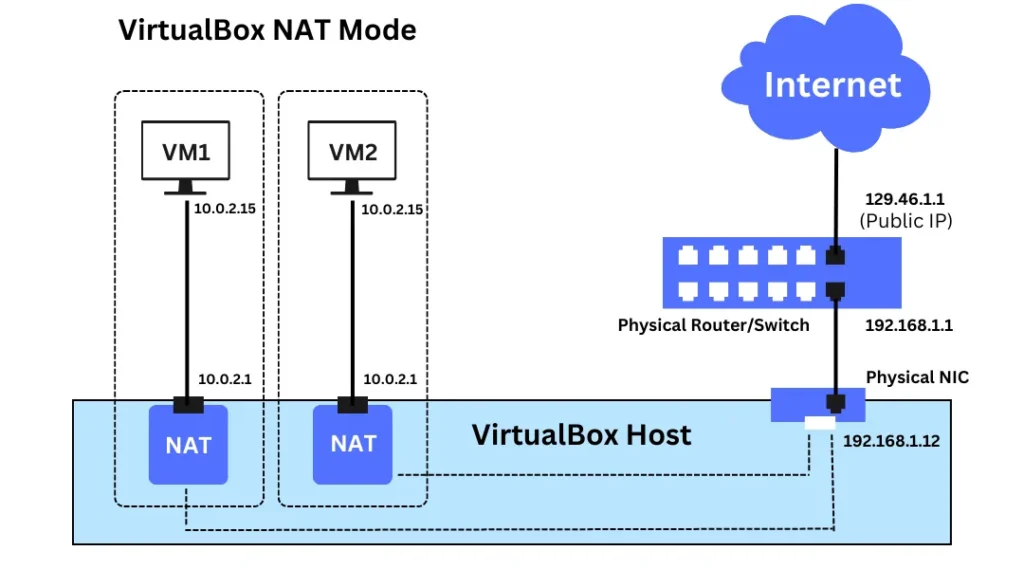
NAT mode allows the virtual machine (VM) to connect to the host machine and the internet. Note that, this is a one-way connection. By default, you cannot connect to the VM from the host machine or any other physical machine.
Here’s a graphical representation of how a NAT mode in VirtualBox will look like:
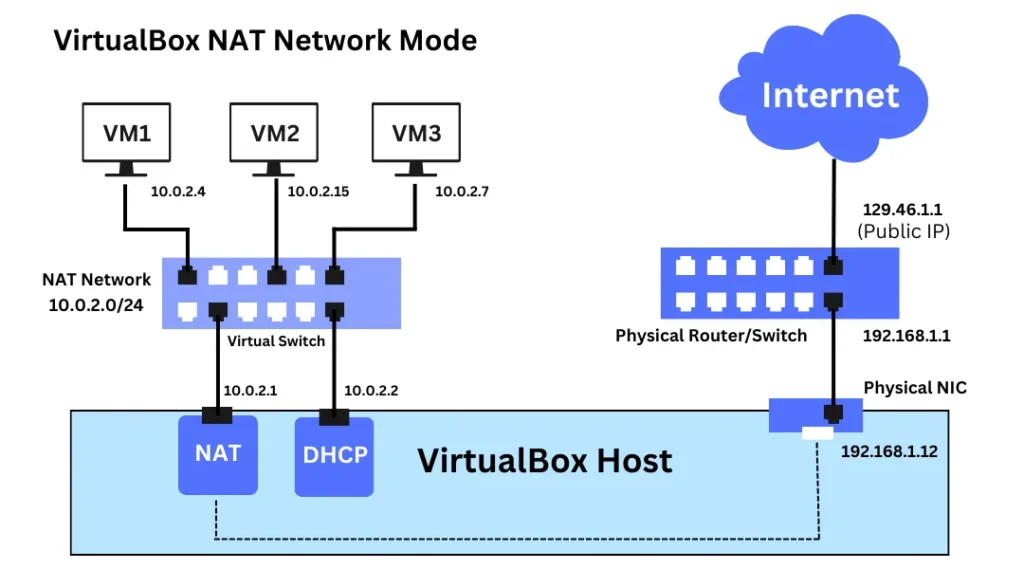
NAT Network mode creates a network that groups all the virtual machines into a network. These machines cannot be accessed directly from the outside systems. However, all the inside machines (VM) can communicate with each other and to the internet.
Here’s a graphical representation of how a NAT network mode works in VirtualBox:
Now that you know what a NAT Network is, it’s time to create a NAT Network in VirtualBox. You can create a NAT network in VirtualBox graphically or through the command line.
Create a NAT Network using VirtualBox GUI
Here are the steps to create a NAT Network in VirtualBox graphically.
1. Open VirtualBox.
2. Click on “Tools”, then click on NAT Networks.
3. Click on “create” to create a new NAT Network.
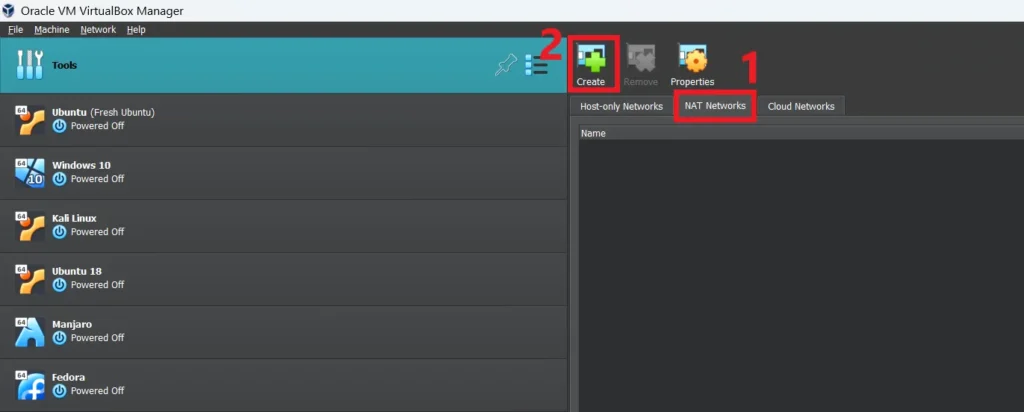
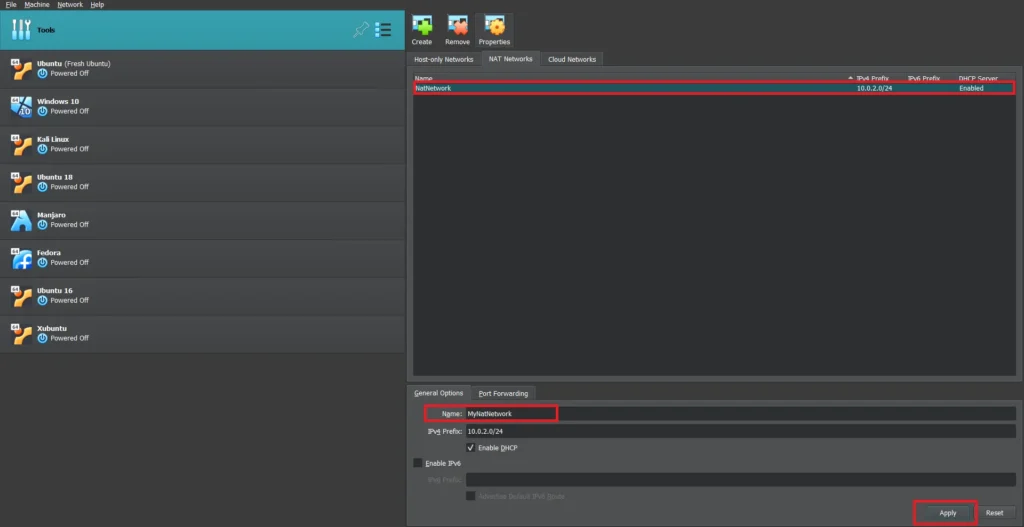
4. After you click on the create button, you’ll notice that a “NatNetwork” is created that uses the 10.0.2.0/24 IPv4 prefix. Also, DHCP is enabled in that network.
5. (Optional) You can click on the newly created Nat network and change its general settings such as Name and IPv4 prefix etc. I am only changing the name here to “MyNatNetwork”.
The steps for creating a Nat Network are complete and you can proceed with adding a VM to Nat Network.
Adding VM to Nat Network (Graphically)
As you have created the Nat Network, you need to add VMs to this network to have connectivity between the VMs. Follow these steps to add a VM to Nat Network.
1. Click on the virtual machine and click on settings.
This will open the settings related to the particular virtual machine.
2. Navigate to the network tab. Make sure one of the network Adapter is enabled. By default, Adapter 1 is enabled.
3. From the dropdown next to “Attached to”. Select the “NAT Network” option.
4. In the name dropdown, select the Nat Network you created earlier. In my case, it’s “MyNatNetwork”.
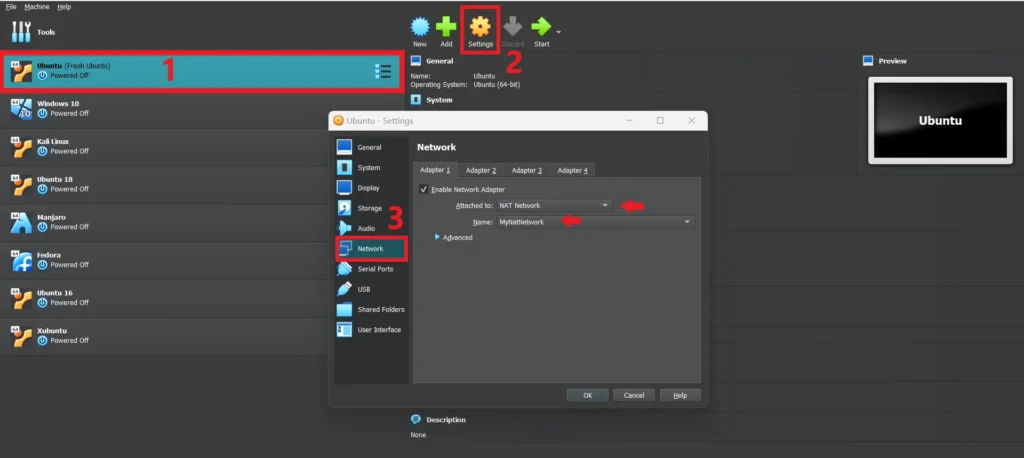
5. Click on “OK” to save changes and exit the VM settings.
That’s it. Your VM is now a part of the Nat Network. Repeat the step for other VMs and then proceed to the “Check connectivity between VMs” section of this article.
Create a NAT Network using the VBoxManage utility
For those who prefer a command-line interface. You can follow these steps to create a NAT Network and assign it to a VM through the VBoxManage utility.
1. First, open the command prompt on Windows and set the path of the VirtualBox installation folder.
SET PATH=%PATH%;C:\Program Files\Oracle\VirtualBox
2. Now use the following command to check for any existing NAT Networks:
$ VBoxManage list natnetworks
Name:         MyNatNetwork
Network:      10.0.2.0/24
Gateway:      10.0.2.1
DHCP Server:  Yes
IPv6:         No
IPv6 Prefix:
IPv6 Default: No
In my case, there is one “MyNatNetwork” which I created earlier through the graphical method. You might not see anything here right now.
3. Now, let’s create a NAT Network using the following command:
Note: This command will create a Nat Network with “NatNetworkCMD” as its name and “192.168.10.0/24” as its IPv4 prefix. You can change the name and IP prefix according to you.
$ VBoxManage natnetwork add --netname NatNetworkCMD --network "192.168.10.0/24" --enable
4. Once again, list all the NAT Networks using the command:
$ VBoxManage list natnetworks
Name:         MyNatNetwork
Network:      10.0.2.0/24
Gateway:      10.0.2.1
DHCP Server:  Yes
IPv6:         No
IPv6 Prefix:
IPv6 Default: No
Name:         NatNetworkCMD
Network:      192.168.1.0/24
Gateway:      192.168.1.1
DHCP Server:  Yes
IPv6:         No
IPv6 Prefix:  fd17:625c:f037:2::/64
IPv6 Default: No
You’ll notice the newly created “NatNetworkCMD” is on this list.
5. Start the NAT service using the following command:
$ VBoxManage natnetwork start --netname NatNetworkCMD
6. Lastly, assign the newly created NAT Network to a VM.
Note: The following command is assigning the newly created NatNetworkCMD to a virtual machine named “Xubuntu” on my system. Make sure to change the name of VM and the Nat Network accordingly.
$ VBoxManage modifyvm Xubuntu --nic1 natnetwork --nat-network1 NatNetworkCMD
You can check graphically that the NAT network is assigned to the VM by checking the VM network settings. Repeat step number 6 and assign the NAT network to multiple VMs.
Check connectivity between VMs
After adding the VMs to the vbox NAT, start the VM and use the ping command to check the connectivity between them.
First, check the IP of all the VMs using the ifconfig (Linux) or ipconfig (Windows) command. Once you know the IP address, try to ping the other machine.
ping 10.0.2.4
(Replace “10.0.2.4” accordingly)
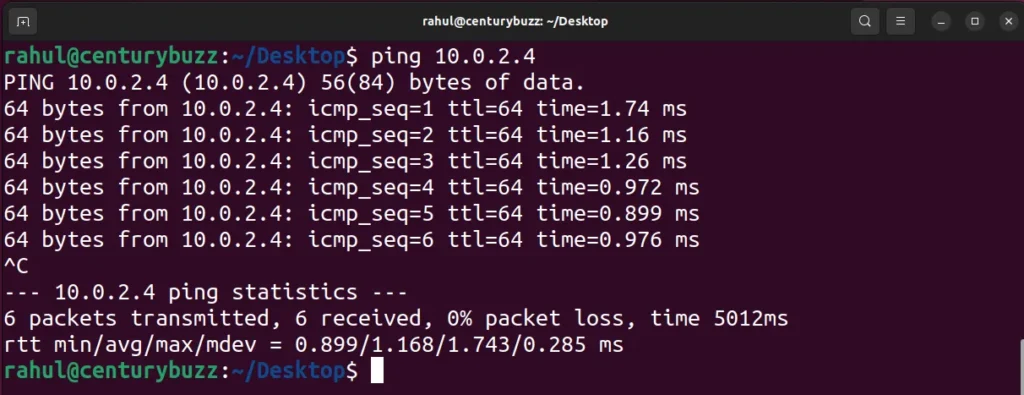
If you get a reply packet, then your NAT network is working properly and your VMs can communicate.
Remove NAT Network
If you wish to remove the vbox NAT, then you can do so graphically by clicking on the Tools, and then clicking on the NAT networks tab.
Now, select the Nat Network and click on the remove button.
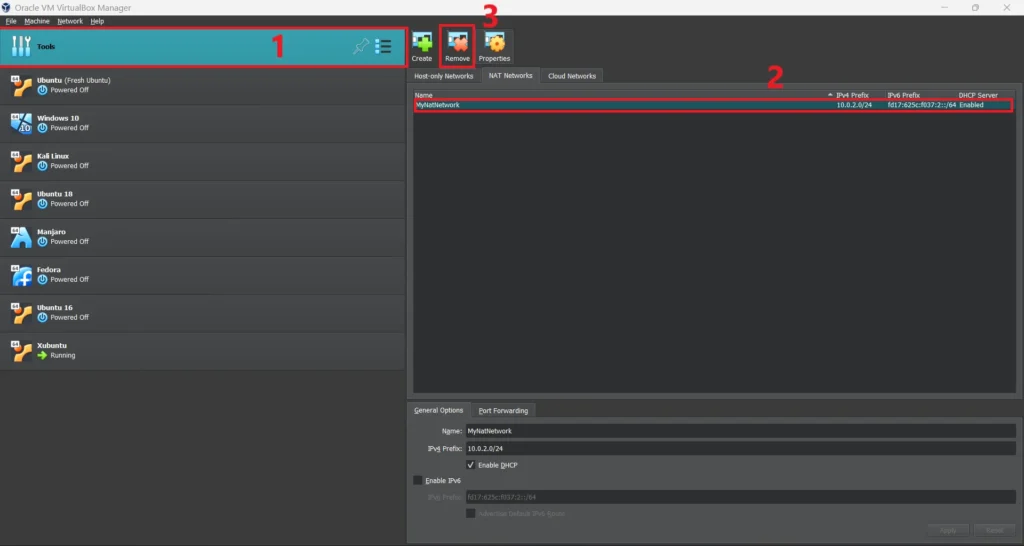
You can also perform the above step through the command line:
$ VBoxManage natnetwork remove --netname NatNetworkCMD
This command will remove the “NatNetworkCMD” we created earlier. If you wish to remove any other Nat network, then use that network’s name instead.
Note: Make sure to change the network settings of the guest OS after removing the NAT network to avoid any problems.
Conclusion
In this guide, I have shown you how to set up the VirtualBox NAT network through the graphical interface and using the VboxManage utility. I hope everything went smoothly while creating the NAT Network in VirtualBox. If you have encountered any errors feel free to ask in the comments.
If you like this post, then follow CenturyBuzz on Facebook and X (Twitter) for more reviews, tips and tutorials.
