How to Fix Read-Only File System Error on Linux?
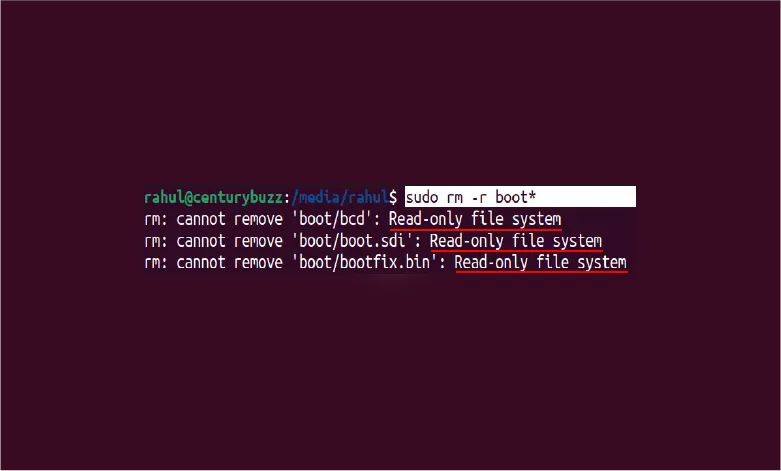
The “Read-only file system” error occurs when a Linux system goes into read-only mode. This prevents you from making any modifications to the file system such as adding, deleting, or modifying the files.
It is one of the most common file system errors you can face in your Linux system. Fortunately, there are several fixes for this error and we will discuss them in this article.
First, let’s have a look at some possible causes of this error.
Causes of “Read-Only File System” error

Below are some of the common reasons for the read-only file system error on Linux:
Improper system shutdown
Whether it’s an abrupt power loss or you have a knack for switching off the Linux system directly using the power button to save time. Improper shutdown is one of the most common reasons for the “Read-only file system” error on Linux.
Corrupt File system
If the file system is corrupted, the Linux system will mount the system in read-only mode to prevent further damage.
Incorrect File system configuration
Incorrect configuration in the /etc/fstab file can also cause the system to mount in read-only mode.
Hardware issues
Hardware issues such as faulty hard drives or bad sectors can cause the Linux file system to switch to read-only mode, thereby causing the read-only file system error.
Troubleshooting the Read-Only File System Error
1. Restart your Linux System
This doesn’t seem like a solution, however, in many cases, a system restart might be all that is needed to fix most common Linux issues, including the read-only file system error.
After restart, check the error is resolved by trying to modify any file.
2. Fix the file system errors (command-line)
The simplest method to check for file system errors in Linux is to use the “Fsck” command. Fsck is a utility to check and repair any file system errors on Linux.
Note: You need to unmount the file system before using the “fsck” command.
sudo fsck -f /dev/sdb1
Replace “/dev/sdb1” with the name of your affected partition.
3. Fix the file system errors (Graphically)
You can also try to repair the file system through a graphical method. Just follow the below steps:
1. Start GNOME Disks from the applications menu in Ubuntu.
2. Select the affected filesystem and click on the “gear” icon.
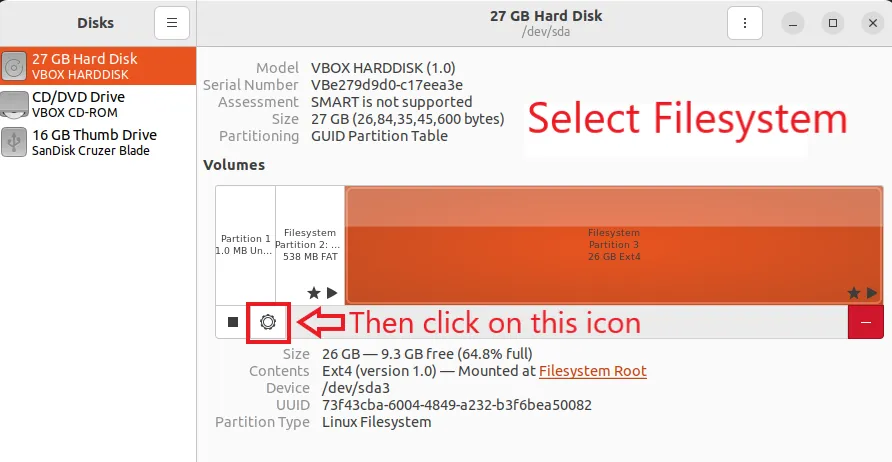
3. Choose the “Repair Filesystem” option.
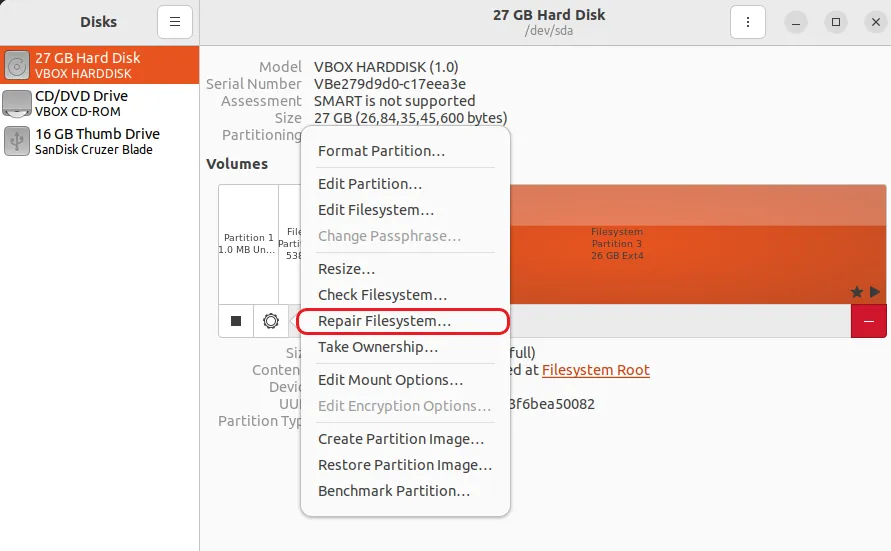
After that, reboot the system and check if it resolves the issue.
4. Remount the file system with read-write permissions
You can try to remount the file system using the read-write (rw) option. To do that use the “mount” command.
sudo mount -o remount,rw /dev/sdb1 /media/rahul
Replace “/dev/sdb1” with your file system name and “/media/rahul” with the appropriate mount point.
5. Check the /etc/fstab file
The File system table (or fstab in short) is a configuration file located in the “/etc” directory on Linux. This file contains information about filesystems and how and where they should be mounted during the boot process.
Improper entry in the /etc/fstab file can cause the filesystem to switch to read-only mode.
To view the contents of the “/etc/fstab” file and check for any misconfigurations, open the terminal and type the following command:
cat /etc/fstab
The output of the command will contain many things. However, you don’t have to focus on the lines starting with a hash (#) symbol. Those lines are just comments.
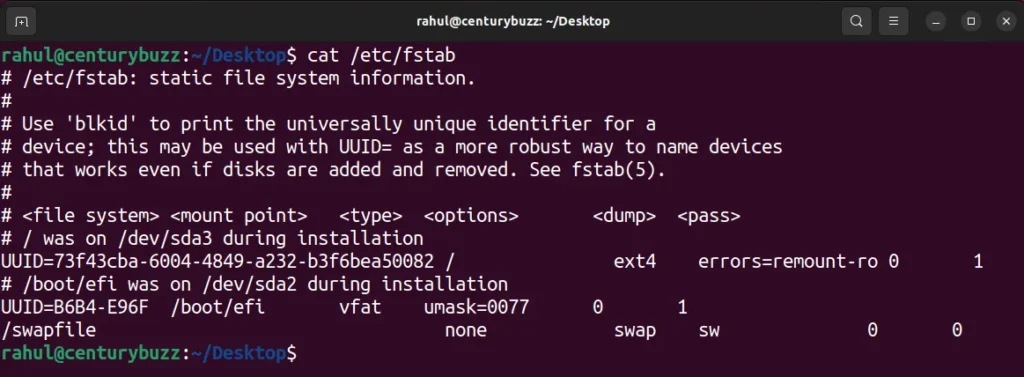
The lines you should worry about will look something like this:
UUID=73f43cba-6004-4849-a232-b3f6bea50082 / ext4 errors=remount-ro 0 1
Now, let’s break down each field in the above fstab entry. Every field is separated by space or tab in the fstab file.
UUID=73f43cba-6004-4849-a232-b3f6bea50082
The is the filesystem UUID (Universally Unique Identifier). Usually, you’ll see the UUID or the device name such as “/dev/sda1” here.
/
This is the mount point. It is the directory where the filesystem will be mounted. For example, it can be /, /home, or /media.
ext4
“ext4” denotes the filesystem type. Depending on the filesystem type it can also be btrfs, xfs, or swap.
errors=remount-ro
This is a mount option. There can be multiple options in this field that are separated by commas. This determines how the filesystem should be mounted. Some examples of mount options include defaults, user, rw and errors=remount-ro.
0
This field contains a value used by the dump utility to determine if the filesystem should be backed up. This is usually set to 0 (disabled) or 1 (enabled).
1
This field contains a value used by the “fsck” utility to determine the order in which filesystems should be checked. Since it is the entry of the root filesystem in my system’s fstab file, it has a value of 1, the other filesystems should have a value of 2 or higher.
Now that you can understand the fstab entry, you can check for any incorrect entries or misconfigurations. If you find any misconfiguration, open the “/etc/fstab” file in a text editor with root privileges.
Note: Be cautious while editing the /etc/fstab file, an incorrect configuration can render your system unbootable. Create a backup of the original file before making any changes.
You can use the nano text editor in the terminal:
sudo nano /etc/fstab
Make the necessary changes, and then save the file by pressing Ctrl + X, followed by hitting the y key, and then hitting Enter.
Once you have made changes to the /etc/fstab file, reboot your system to ensure that the new configuration is applied:
reboot
6. Disable Windows Fast Startup
If you’ve got a dual boot setup of Linux alongside Windows 10/11, then it’s probably the Windows fast start-up option that’s holding onto your filesystem.
To fix this you need to boot into the Windows system and disable fast start-up.
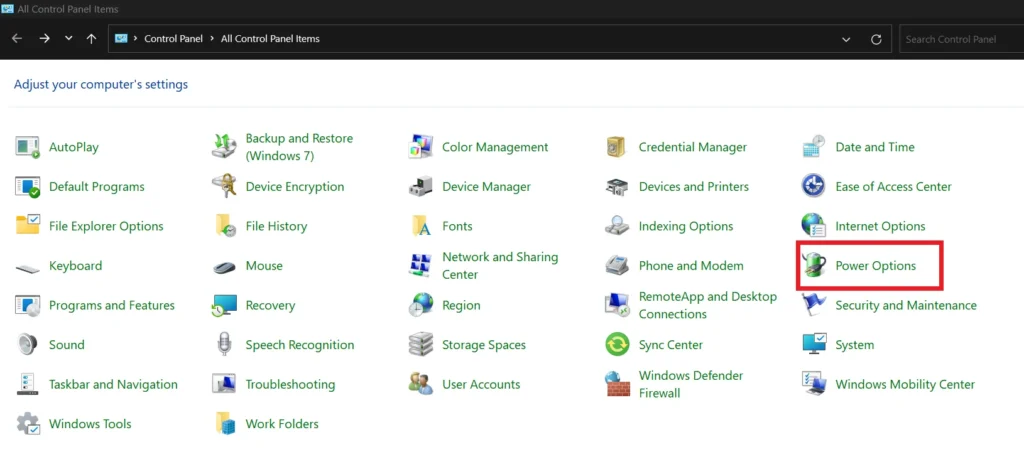
1. Open the Control Panel and click on “Power Options”.
2. Click on “Choose what the power button does” on the left sidebar.
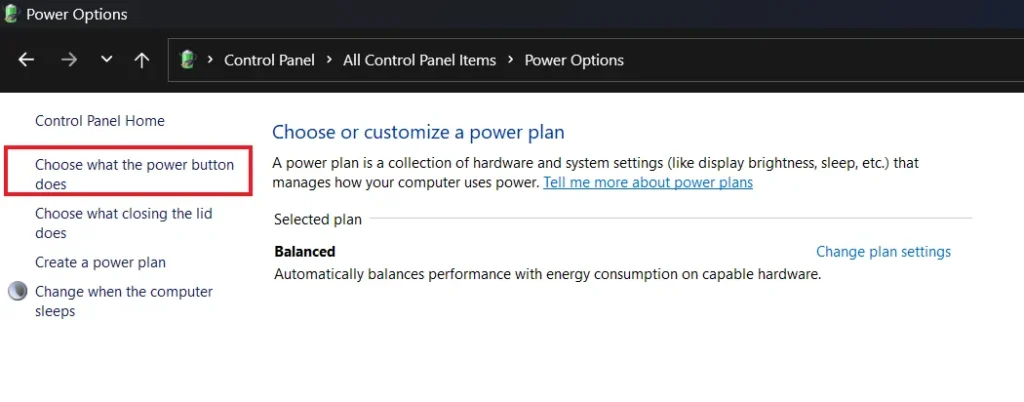
4. Click on “Change settings that are currently unavailable”.

5. Uncheck the “Turn on fast startup”.
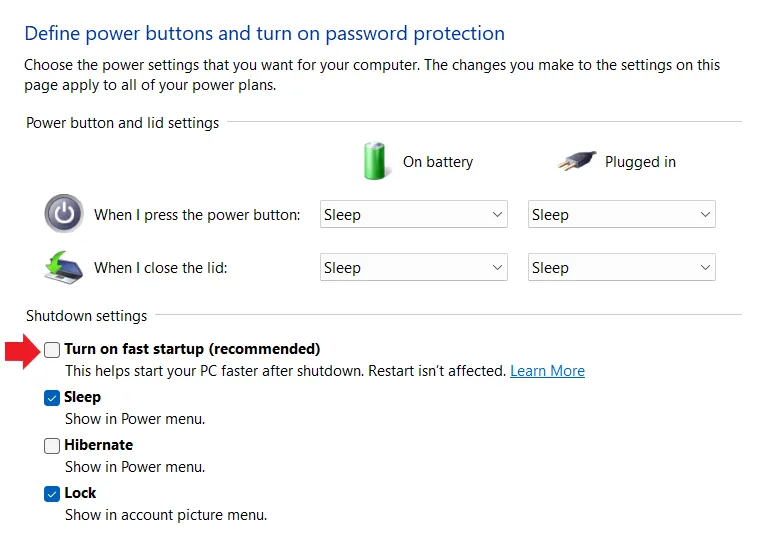
6. Save changes and then reboot into your Linux system. This should resolve the “read-only file system” error on Linux.
7. Check Hard Disk health
If none of the above-mentioned fixes worked for you, then there is a chance that you’re dealing with bad/damaged sectors.
There are many tools available for checking hard disk health in Linux. You can try them and see if that fixes the read-only file system error.
Best practices to prevent read-only filesystem error in future
If you want to avoid this error in future, then make sure to follow these best practices.
1. Properly shut down your Linux system.
You should follow the proper procedure to shut down the system rather than trying to save time. After all, haste makes waste.
Proper shutdown will also prevent your system from getting corrupted.
2. Periodic Hard Disk Health Check.
You can use “fsck” to check your hard drive for errors from time to time. This will help you to address any issue as soon as it arises.
3. Back up your important data.
Always keep a timely backup of your important data to avoid any data loss in case of file system corruption or hard disk failure.
4. Connect to a UPS (Uninterrupted Power Supply)
If you use a desktop at a place that is greeted with frequent power failures, then it’s best to invest in a UPS. This will give you enough time to save your work and properly shut down your computer.
5. Always keep a Linux Live USB ready.
There are errors which don’t even let you use the system. In the case of a “read-only filesystem” error, if it happens in the root partition, then you will need to perform the fixes from a live Linux session. So, always keep a bootable Linux USB ready.
Conclusion
I understand that the read-only filesystem error can be frustrating, however using the above-mentioned fixes, you can resolve the issue in a timely manner.
Once you understand the reason for the error, make sure to follow the appropriate prevention methods to prevent this error from occurring again in the future.
If you have solved the “read-only file system” error using any other method that is not mentioned in this article, then do share it in the comments.
If you like this post, then follow CenturyBuzz on Facebook and X (Twitter) for more reviews, tips and tutorials.
